Stereo Microscope Parts: Know Your Gear Inside & Out

A low power or stereo microscope typically employs objective lenses of 50x or less. It is used to view specimens that are visible to the naked eye such as insects, crystals, circuit boards and coins.
A stereo microscope has three key parts:
- Viewing Head/Body that houses the optical components in the upper part of the microscope
- Focus Block that attaches the microscope head to the stand and focuses the microscope
- Stand that supports the microscope and houses any integrated illumination.
Stereo microscopes are increasingly modular. This means that the same head can be used in conjunction with different focus blocks and stands. For example, Microscope.com offers a range of pole stands, track stands and boom stands.
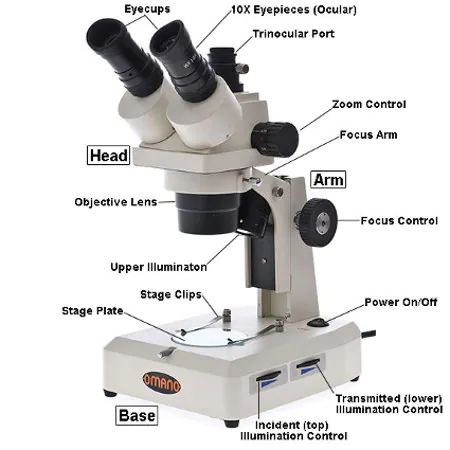
Take time to familiarize yourself with the parts of a stereo microscope contained in the image below.
OPTICAL COMPONENTS
As in a compound microscope, there are two optical systems in a compound microscope: Eyepiece Lenses and Objective Lenses.
Eyepieces or Oculars are what you look through at the top of the microscope. Typically, standard eyepieces have a magnifying power of 10x. Optional eyepieces of varying powers are available, typically from 5x-30x.
Eyepiece tube holds the eyepieces in place above the objective lens.
Diopter adjustment ring that allows for the possible inconsistencies of our eyesight in one or both eyes. Binocular microscopes also swivel (Interpupillary Adjustment) to allow for different distances between the eyes of different individuals.
Objective Lenses are the primary optical lenses on a microscope. In a low power microscope, they provide fixed magnification or zoom magnification. Zoom magnification is typically offered in a Greenough design or with a Common Main Objective.
Focus Control Most stereo microscopes have only coarse focus controls.
Working Stage is where the specimen to be viewed is placed. Pole and track stands have simple stages since lower magnification powers require less subtle movements than high power microscopes.
Stage Clips are used when there is no mechanical stage.
Transmitted Illumination Since most specimens examined on a stereo microscope are opaque, a top light (Transmitted Illumination) is used to shed light on the specimen. Some stereo microscopes also include a bottom light (Incident Illumination).
STEREO MICROSCOPE: OPERATING TIPS
Set the microscope on a flat surface in a stable and comfortable position.
Turn on The Transmitted/Oblique illuminator. Place a small solid specimen onto the stage such as a card, coin or any other flat, detailed object.
Turn the Magnification adjustment knob to the lowest power and bring the image into focus using the focus control.
Adjust the eyepieces for the correct interpupillary distance to suit you. Do this by moving the eyepieces closer together or farther apart until a single field of view is observed (B). Now, set the Dioptric adjustment rings on both eyepieces to the zero position (A).
Use the Magnification adjustment knob to set the highest magnification. Bring the image into focus with the focusing knob. Center the image on some clear point of detail on the specimen.
Adjust the microscope down to the lowest magnification using the Magnification adjustment knob. The image could be slightly out of focus.
Do not adjust the focus with the focusing knob. Adjust the focus for each eye separately using the eyepiece Dioptric adjustment rings. Your microscope is now "parfocal". This means that as the microscope is zoomed from high to low magnification the image will stay in focus throughout the entire range. Each individual will have a different setting.
Your stereo microscope is now set up. Enjoy!