Student's Guide: How to Use a Light Microscope

The world, as seen by the naked eye, is an interesting place in and of itself. It was a place of many unexplained phenomena that pre-contemporary people attributed to sorcery or magic.
The invention of one simple tool, namely the magnifying lens — so taken for granted by today's standards — is what unlocked a whole new dimension of reality that changed humanity's understanding of nature and oneself.
Eventually, man's mythical universe was replaced by the evolving methods of science and aided by its equally evolving instrument of choice — the microscope.
Today, microscopes are notoriously used across many modern human industries.
Because they are the primary gateway to understanding minute structures from cells to minerals, they remain a critical tool in scientific research, material science, biophysics, medicine, circuitry, engineering, and forensics, among others.
The most basic of man’s microscopy arsenal is the light microscope.
What is a light microscope?
A light microscope is an optical instrument used to view objects too small to with the naked eye. It is so-called because it employs the use of white or visible light to illuminate the object of interest so it can be magnified and viewed through one or a series of lenses.
Microscopy, then, can be referred to as the technical field of utilizing a microscope to visualize the fine details of samples and objects too minute to see with the unaided eye.
Microscopists use a combination of material knowledge, sample preparation, and an intimate understanding of the microscope to investigate a wide range of materials from complex biological specimens to inanimate objects in order to understand their structure, behavior, and potential applications.
Practical Applications of Light
Light microscopy has wide-ranging utility in scientific investigations. Many jobs in the sciences and engineering fields use a microscope as part of their work process.
Light Microscopy in Biology
A microscope is a microbiologist's weapon of choice. They regularly use light microscopes to study microscopic organisms such as bacteria and fungal colonies. Along with more sophisticated electron microscopes and computer imaging software, they uncover the mysteries of life beyond what the human eye can see.
A biochemist and biophysicist’s speciality is investigating processes that occur within living systems. They work with bio components such as enzymes on the daily to understand how their interaction answers some practical questions. For this task, optical or light microscopes are used alongside powerful electron microscopes and computer programs.
Biological technicians whose tasks include preparing biological samples such as blood and bacteria cultures for laboratory analysis are required to have in-depth know-how of microscope usage.
Light Microscopy in Forensic Science
Scientists working in law enforcement are tasked to analyze diverse samples of crime scene evidence. These samples can range from the smallest clothing fibers to DNA in hair follicles. Results from these analyses are critical in solving thousands of cases per year.
Light Microscopy in Gemology
Jewelers and gemologists use microscopes to determine the value of a gem, to examine their fine details, and to ensure the pieces are properly polished. Identifying the kind of gemstone and determining its quality is central to the work of a gemologist or gem appraiser. In such a job, a microscope becomes the primary tool for verification.
Light Microscopy in the Environmental Sciences
Researchers in the fields of geoscience and environmental science employ light microscopy across a wide range of applications. For instance, investigating pollutants in a water source requires looking at the microbiota present in its samples. Geoscientists work closely with minerals. Only in examining the details can they be accurately identified and attributed.
Light Microscopy in Schools
Given microscopes’ vital role in science, students are taught how to use a light microscope in the classroom. Early exposure to such a tool and acquiring the skill of manipulating a microscope:
- serves as preparatory training for a future career in the sciences or related fields;
- helps them engage in their own scientific investigations; and
- aids in ongoing scientific research in school.
Learning light microscopy and what it entails opens students’ perspectives to a whole new world of possibilities both academic and practical.
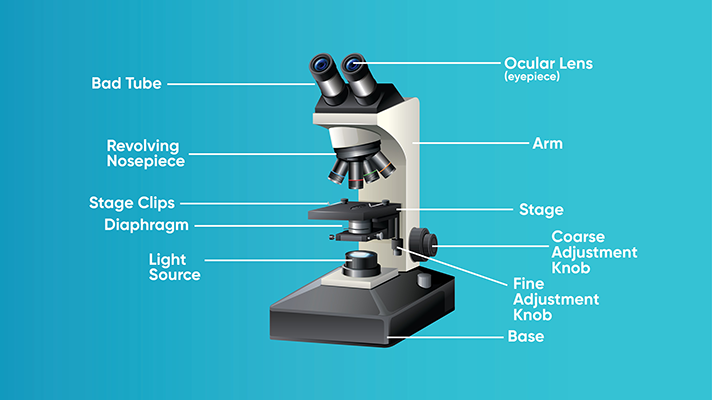
Parts of the Light Microscope

- Base - the flat structure of the microscope that serves as its foundation
- Arm - connects the base of the microscope to the nosepiece and eyepiece; used to carry the microscope around
- Stage - the flat platform where the slide is put in place for viewing; can be adjusted via the coarse and fine adjustment knobs
- Illuminator - steady light source
- Iris/Diaphragm - an adjustable apparatus located below the stage which can be manually modified to vary the intensity of light that reaches the specimen
- Body Tube - connects the eyepiece to the objective lenses
- Condenser Lens - collects the light from the illuminator and focuses it on the specimen
- Eyepiece Lens/Ocular - lenses that the viewer looks through
- Eyepiece Adjustment Knobs - used to bring the specimen into focus
- Stage clips - used to keep the slide in place
Types of Light Microscope
Bright Field Microscope (Best for Students)
Most microscopes used in classrooms are bright field microscopes. Bright field microscopy is the simplest form of optical microscopy illumination techniques.
The term is derived from the fact that the specimen appears darker in contrast to the bright background.
Light from the illuminator is collected by the condenser and focused at the specimen mounted on the space. The light that passes through the specimen then goes through the objective lenses and ultimately through the eyepiece.
The specimen can either be stained or colorless. The pigmentation creates contrast which allows the viewer to see the image of the object being observed.
This conventional technique is most suitable for observing the natural colors of the specimen. However, it’s not easy to see cell organelles using this technique.
Phase-Contrast microscope
For the purpose of viewing structures (e.g., organelles) within microscopic living cells, a phase-contrast microscope is used. This contrast-enhancing optical technique makes use of the minute differences in phase to create high-contrast images of an unstained specimen.
Phase-contrast microscopy employs special phase-contrast objectives and condensers to take advantage of refractive index variations.
As a result, the viewed image of the specimen appears brighter or darker than its background.
Ultraviolet Microscope
An ultraviolet microscope uses UV light to view specimens at a resolution that isn't possible with the common brightfield microscope. It utilizes UV optics, light sources, as well as cameras.
Because of the shorter wavelengths of UV light (180-400 nm), the image produced is clearer and more distinct at a magnification approximately double what is achieved by using only visible light (400-700 nm).
Fluorescence microscope
Considered one of the most versatile techniques of optical imaging, fluorescence microscopy uses a fluorescent substance (e.g., fluorochromes or fluorophores) to tag or label a specimen of interest. A fluorescent microscope uses a high-intensity illuminator which then excites the fluorophores in the sites of interest. As a result, the excited regions in turn emit light of a longer wavelength which makes it visible for observation. Filters help produce the final image.
Because it's more costly to conduct, fluorescence microscopy is usually reserved to important studies such as examining substances in low concentration.
Practical applications of fluorescence microscopy include studies of porosity in ceramics, studies of semiconductors, and studies of nerve cells.
Confocal microscope
Confocal microscopy is regarded as a superior imaging technique that produces high-resolution, high-contrast images. It uses fluorescence by focusing a laser over the specimen and collecting data from the emissions to reconstruct a final image.
A common issue in viewing biological specimens via conventional light microscopy is glare captured from multiple focal planes producing light noise that can distort the image, especially if the specimen is thicker than the plane of focus.
In confocal microscopy, spatial filtering is used to eliminate this glare by focusing light on a single point within a defined focal plane. This produces impressively sharp images.
Steps on How to Use a Light Microscope
- Step 1: Connect the light microscope to a power source. If your microscope uses a mirror instead of an illuminator, you can skip this step. Instead, find a place where natural light is easily accessible
- Step 2: Turn the revolving nosepiece so the lowest objective lens is in position.
- Step 3: Mount your specimen onto the stage. But before doing so, see to it that your specimen is adequately protected by placing a coverslip on top of it.
- Step 4: Use the metal clips to keep your slide in place. Make sure the specimen is positioned in the center, right under the lowest objective lens.
- Step 5: Look into the eyepiece and slowly rotate the coarse adjustment knob to bring your specimen to focus. See to it that the slide does not touch the lens.
- Step 6: Adjust the condenser for the maximum amount of light. Since you're on the low power objective, you may have to decrease the illumination. Use the diaphragm under the stage to adjust.
- Step 7: Now slowly rotate the fine adjustment knob until you obtain a clearer image of your specimen.
- Step 8: Examine your specimen.
- Step 9: After you're done viewing with the lowest power objective, switch to the medium power objective and re-adjust the focus with the fine adjustment knob.
- Step 10: Proceed to the high power objective once you have it focused.
Proper Microscope Cleaning and Maintenance
A good quality microscope is not cheap. Proper care and maintenance ensures your device performs at its best. Here are important tips on how to handle your light microscope.
- Never hold the microscope by the piece. Support the stand and hold the arm when carrying the instrument around.
- Always carry a microscope upright, as the eyepiece could fall off.
- Always turn the illuminator off after you use it.
- Use a non-solvent cleaning solution to avoid damaging the lenses.
- Use a microfiber cloth when wiping off dust and dirt from lenses. There are microscope cleaning kits you can purchase to make microscope cleaning safer and more adequate.
- When the microscope is not in use, cover it with a dust jacket.
- While using the microscope, do not rush through the viewing process. Be careful when handling the knobs, and avoid turning the nosepiece unnecessarily, as they can wear out.


